Taking On Database Migrations
Using LaunchDarkly we can migrate to new databases with less risk of corrupting or losing our data!
Data is at the heart of every application and Toggle Outfitter's website is no exception. The Toggle Outfitter team has been using a static JSON file for managing site inventory. This was totally fine when we were using contact us forms or not selling products online, but as the company has evolved, so too have our data storage needs. The next task at hand is to help migrate the Toggle Outfitters site off of the static system to a centralized Postgres database.
📋 Getting our Application Ready
Before we actually migrate the data over, we're going to need to set up a way for the developer team to monitor the migration process and make sure that the data is following correctly. To do this, we need a way for administrators to view behind the scenes features on the website, some sort of administrative view thingy... We're going to add an admin view to our website with this code. 😂
Step 1: Locate the menu.tsx file in the /src/components subfolder.
Step 2: Add this code in the correct place:
{adminMode ? (
  <NavigationMenu.Item>
    <NavigationMenuLink>
      <AdminPanel />
    </NavigationMenuLink>
  </NavigationMenu.Item>
  ) : null}
This will give our admins the ability to see inventory and order details in its own separate component.
Flag Name: Admin View
Flag Key:
Type: Boolean
Description: optional, if you would like to add
Tags: optional, if you would like to add
Client-Side SDK Availability:
Variations: true:, false:
👀 More Granular Targeting
Up to this point we've been using the Developers segment as our catch-all for when we don't want to fully release the feature, but we can get even more targeted than that! Think a single user, in this case, you!
Step 1: Open up the new adminMode flag that you just created and go to the + Add rules section again.
Step 2: Like the image above, select name and is one of then move to the Values box. Instead of typing something, just click into the box and give it a second to load...
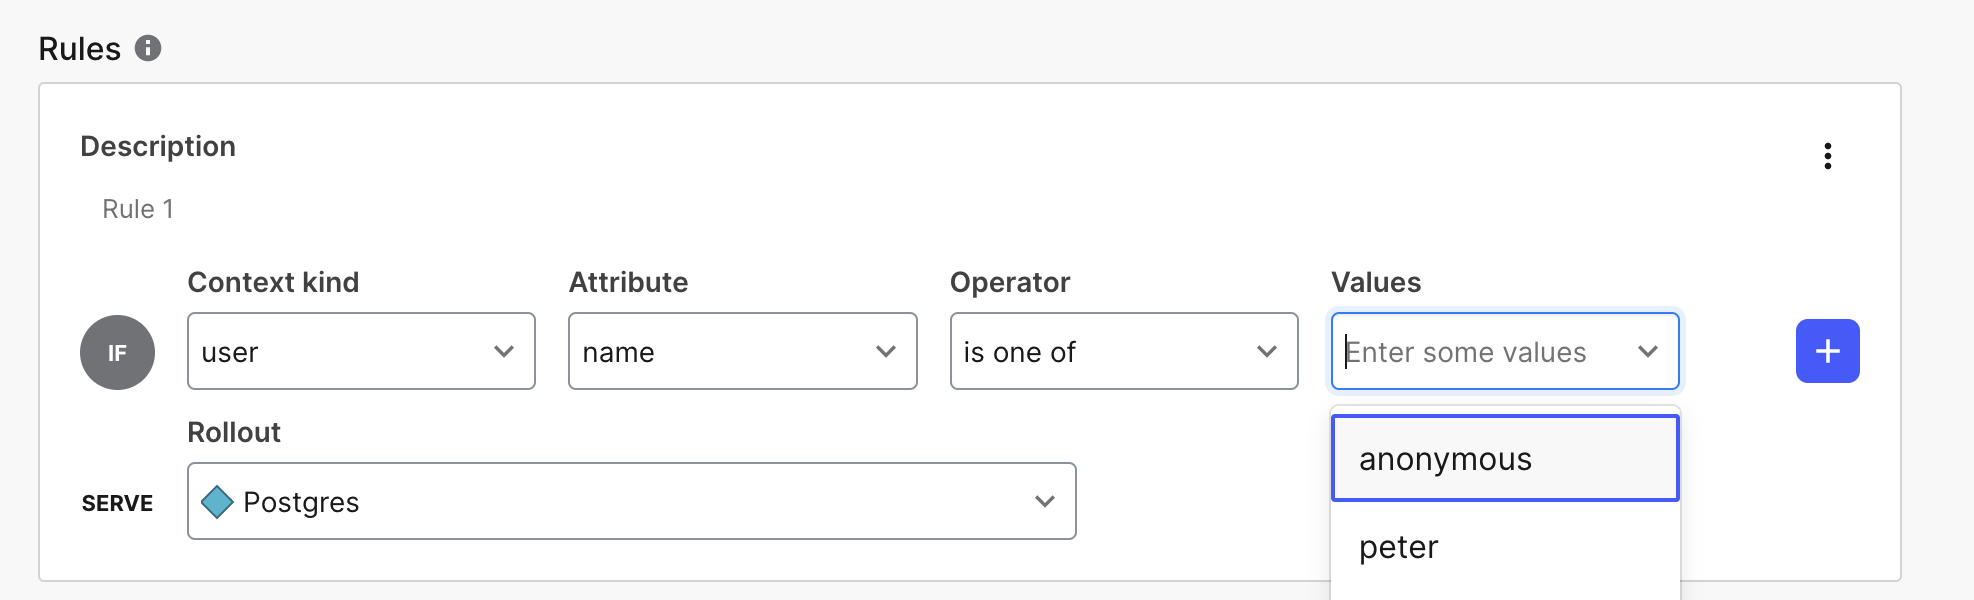
Would you look at that?! You should see the username that you were previously using when logging in as part of the Developer segment! LaunchDarkly keeps track of this information for you and pre-populates it as an option when creating rules. Again, we'll dive more into release targeting and contexts in the next section, but for now just choose your username, set the default rule to false, turn on the flag, and save.
Do I always have to use the user kind?
No! Context kinds can be any sort of identifying information that you collection from an application. In this case we're mainly usingusers, but we could easily use things likeregion,store,device,organization, or anything else!
📁 Prepping the Database Backend
In addition to having our administrative view, we need to set up our application to interact with the new database. To do this we'll need to update another one of our API files.
Step 1: Locate the inventory.ts located in the /src/pages/api subfolder.
Step 2: Copy and paste this code in the correct place:
//we are again evaluating the value of the flag before running a function.
// In this case if the dbTesting flag returns 'postgres' we are running a function to connect to our new database.
dbTesting = await ldClient.variation("dbTesting", jsonObject, false);

  if (dbTesting == 'postgres') {
    databaseConnection(req, res)
  } else {
    res.status(200).json(product)
  }
This code retrieves data from our hosted Postgres table and returns it back for view in the Admin Mode screen.
✅ Flag Approvals
Step 1: To test our migration, we're going to need another flag to enable this code:
Flag Name: Enable New Centralized Database
Flag Key:
Type: String
Description: optional, if you would like to add
Tags: optional, if you would like to add
Client-Side SDK Availability:
Variations: variation 1:, variation 2:
However, before turning the flag on. There's another scenario that we should explore, that being Flag Approvals.
Step 2: In your newly created dbTesting flag, change targeting to on, but instead of hitting Review & Save, hit the dropdown menu:
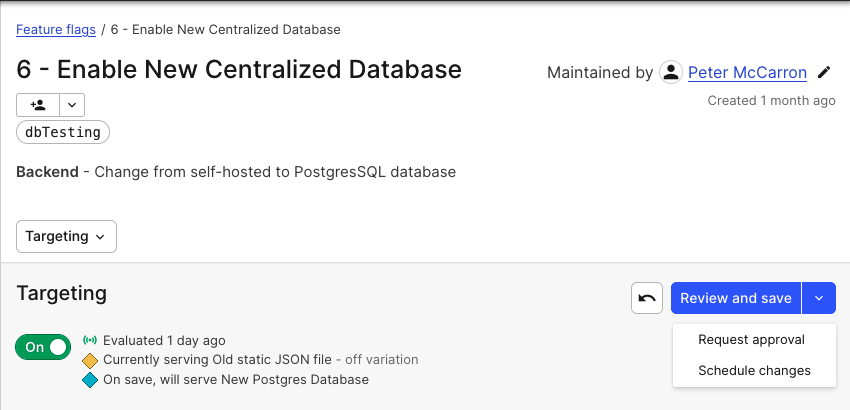
Step 3: Notice the option for Request approval. This is where we can ensure that the right members of our team are aware that we are planning to migrate to the new database. Select that option brings up a screen like this:
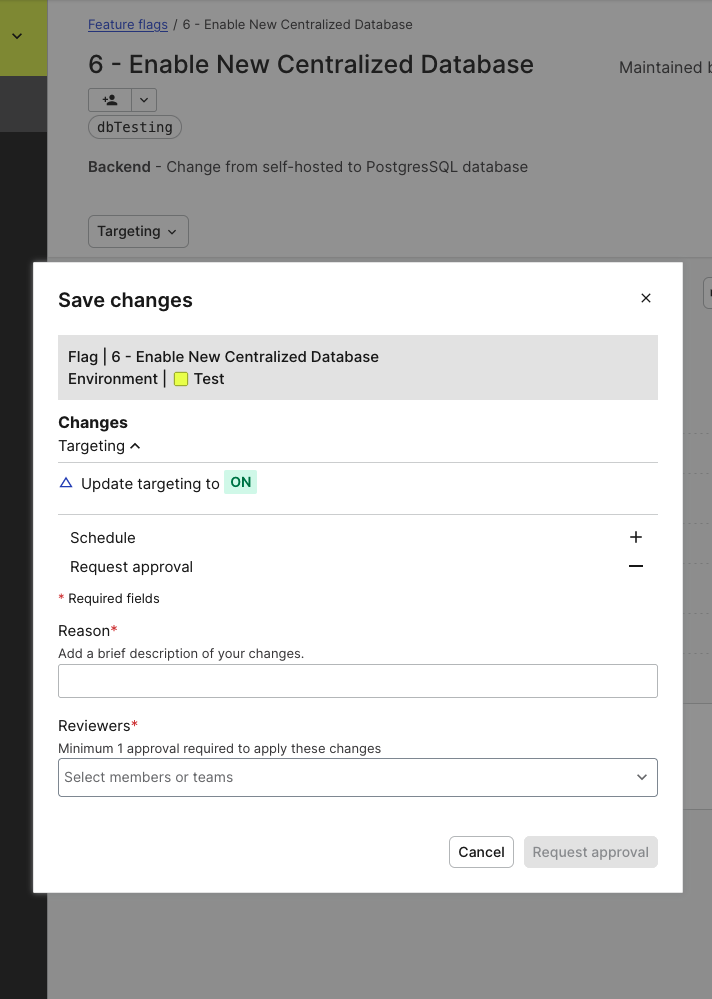
Here we can provide the reason for why we are looking to enable this flag and select the necessary reviewers. We could add our Database Admin to the list of approvers so if there's a problem or they aren't ready for the migration, they can either reject the request or hold off until they know the system is ready. No miscommunication, no outages, no worries! 😁
When would I use approvals?
Normally, organizations have different people responsible for different tools, for example dedicated Database Admins who are responsible for the maintenance and management of the databases. These users are yet another team that we're interacting with and are ultimately responsible for the data being both available and healthy. Because of this, we probably should involve them when we are planning to send live traffic to the database. With LaunchDarkly, we can give them control over when a new database becomes accessible.
🎉 Complete the Migration
At this point, all that's left to do is test things out. We don't have a Database Admin that is approving these requests, so we'll move forward without an approval.
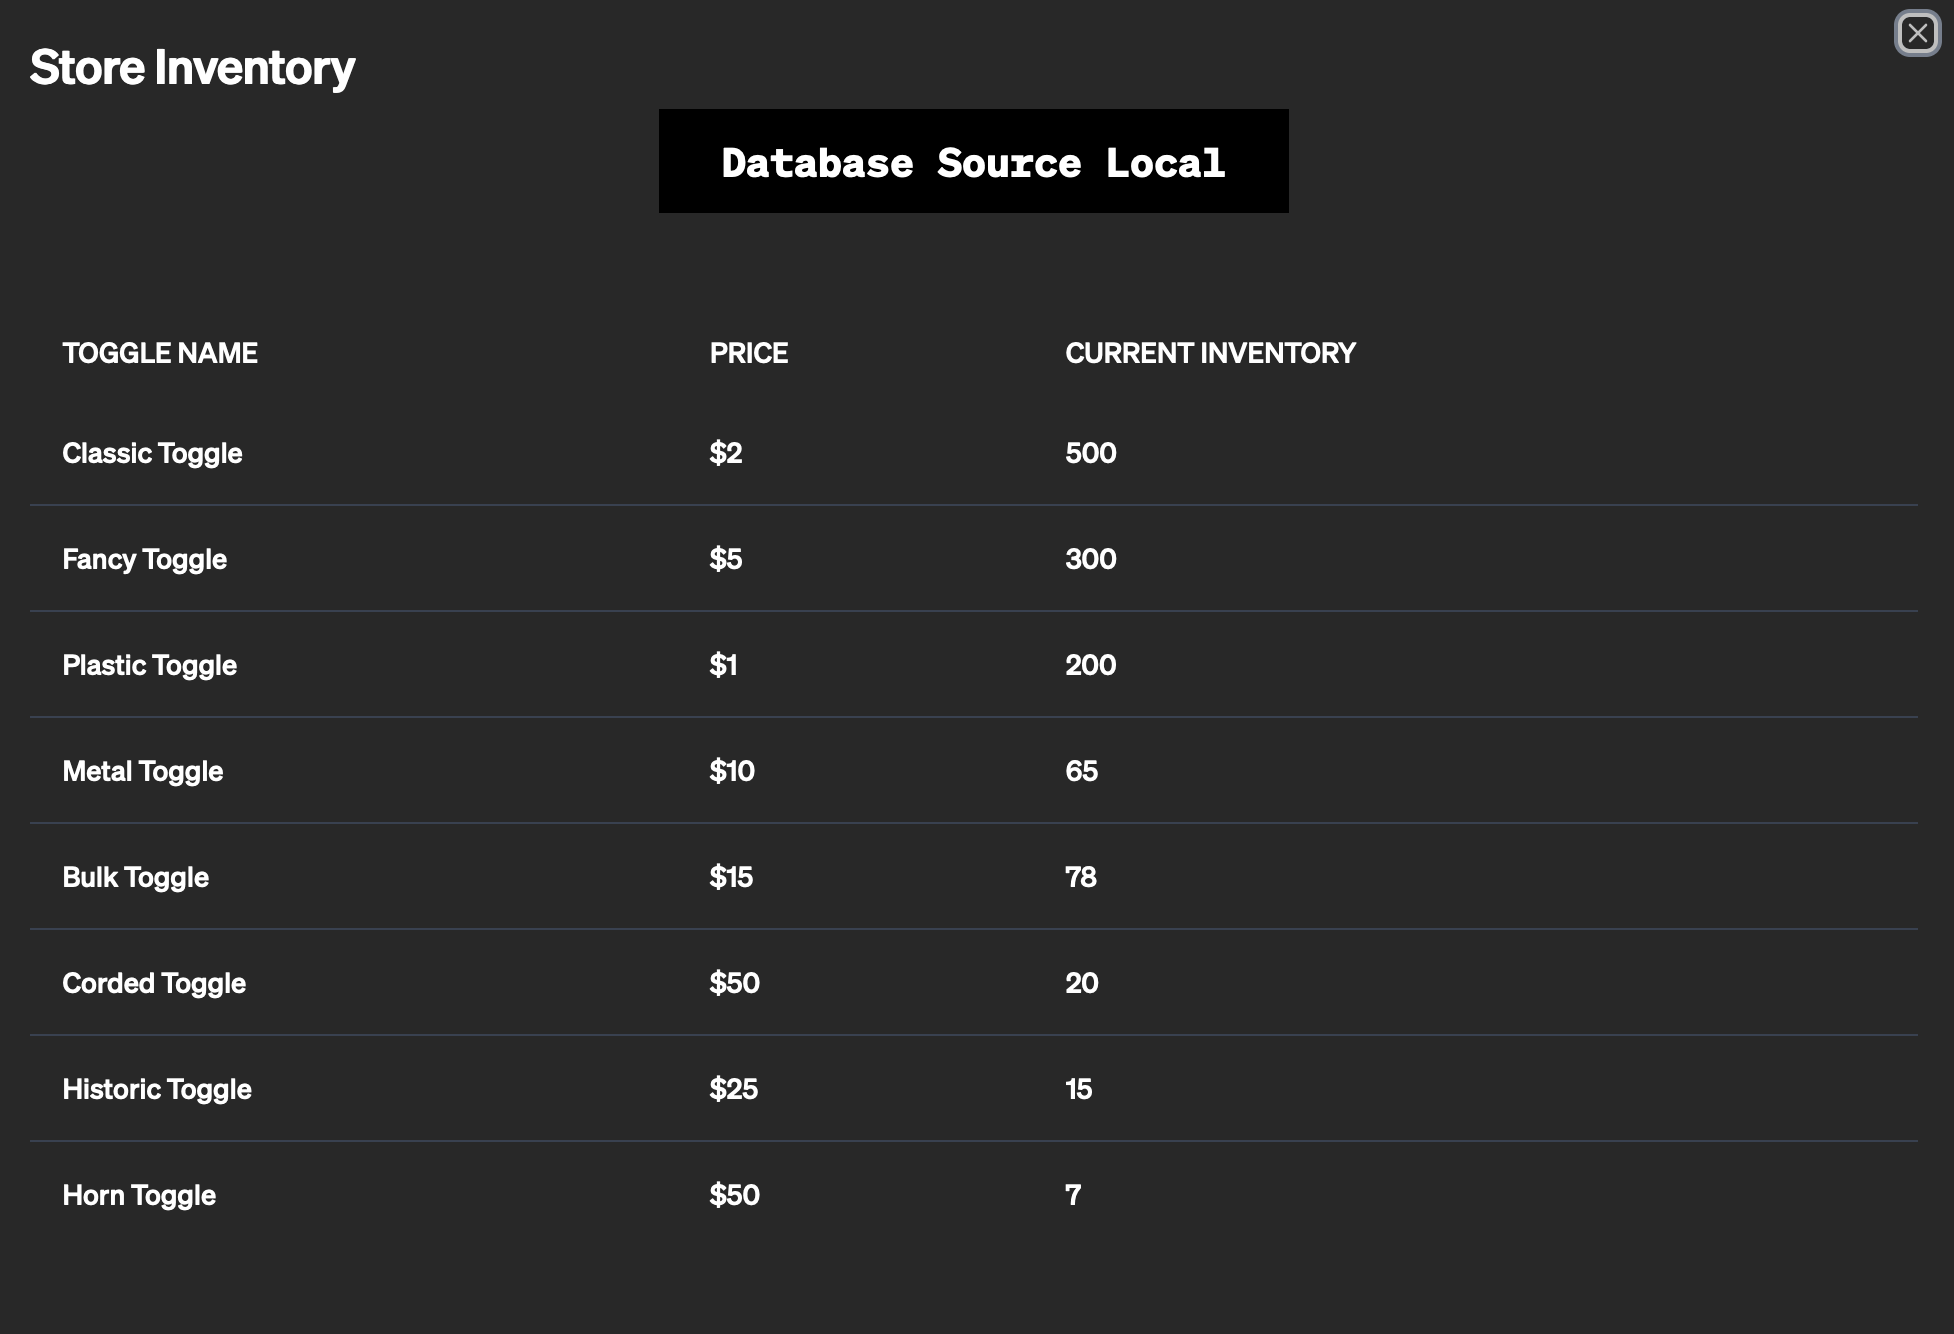
Step 1: Open the Admin View in your application. It should look like this:
Step 2: Enable the dbTesting flag to serve postgres.
You should see the table update! This is data being pulled from that centralized Postgres table instead of a local file. Pretty cool huh? We moved data sources without having to redeploy anything or jump through a bunch of networking hoops, just turning a flag on! 😎
Wow, so you just completed an API migration and Database migration in a matter of minutes instead of months! That'll look good on your first Toggle Outfitter year-end review! But as is always the case, there's more to do. Remember earlier we talked about diving deeper into Release Targeting? Well Section 3 on Release Targeting awaits!
Troubleshooting Tips
If you're having trouble with any of these steps:
- If you aren't seeing the new database information, make sure you chose a
stringflag instead of aboolean. - If you do not see the Admin Panel, check that you are logged in and that your flag is evaluating correctly.